


There are few different ways to sharpen lawnmower blades, including using a bench grinder, hand file, rotary tool, or angle grinder. But here’s a quicker, easier and more accurate method: use a drill and sharpening stone that’s specifically designed for putting a cutting edge back onto dull lawnmower blades.
The following instructions explain how to remove the blade prior to sharpening. But, depending on the design of your mower, you might be able to sharpen the blade without removing it, which will save a considerable amount of time. However, taking the blade off allows greater access to the cutting edges and permits better visual inspection of any damage to the blade, such as stress fractures or excessive wear.
EIGHT STEPS TO SHARPEN MOWER BLADES
1. Disconnect the ignition wire from the spark plug. (If it’s a cordless mower, remove the battery pack.) That’ll eliminate any chance of the engine accidentally starting up while you’re working on the mower. Also, drain the gas tank so it won’t spill any fuel while you remove the blades.
2. Tip the mower onto its side to expose the retaining nut or bolt that secures the blade to the underside of the mower. To keep the blade from turning, wedge a short wood block between the end of the blade and inside surface of the mowing deck. Next, use a large ratcheting wrench and socket to loosen the nut or bolt. If the fastener is rusted on, apply some penetrating oil, such as Liquid Wrench, wait 10 minutes or so and try again. And to increase leverage when loosening a particular stubborn fastener, slip a metal pipe over the wrench handle.
3. After removing the retaining nut or bolt pull off the mower blade, making note of which side of the blade faces downward. It’s important that the blade gets bolted back on in the same orientation.
4. With the blade removed, take a minute and scrape clean the underside of the mowing deck with a narrow-blade putty knife. Remove all caked-on grass, mud, leaves and other debris. Also, clean both sides of the lawnmower blade by first spraying with penetrating oil, and then scrubbing with a stiff-bristle brush.
5. Lawnmower blades typically have a cutting edge on each end, which are positioned on opposite sides of the blade. Each cutting edge is only about 3 or 4 inches long; it doesn’t extend the length of the blade. Clamp the blade in a vice at an angle with one of its cutting edges facing up.
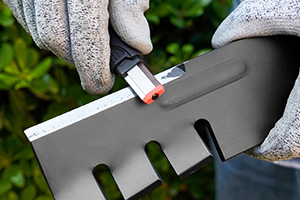
6. Next, you’ll use a drill-powered blade sharpener. It consists of a round abrasive stone, flat sharpening guide, and ¼-inch-diameter steel shank. The stone has a beveled surface that grinds the ideal cutting angle onto the blade.
Chuck the sharpening stone into a drill. Put on some safety glasses. Squeeze the trigger to run the drill at full speed. Slip the spinning sharpener over the edge of the blade. Be sure the dull cutting edge faces the beveled side of the stone, and the flat surface of the guide is against the rear of the blade. Slowly move the stone back and forth along the cutting edge using moderate pressure.
After four or five back-and-forth strokes, stop and check the sharpness of the blade. If necessary, repeat until all nicks and chips have been ground off and the blade is sharp. Remove the blade from the vise and rotate it to sharpen the opposite cutting edge.
7. Once both cutting edges have been sharpened, there’s one more important step: balance the blade. Sharpening can occasionally remove more metal from one end of the blade than the other, resulting in an unbalanced blade. Mowing with a blade that’s out of balance will cause excessive wobbling, which can damage the motor and put undue stress on the mower.
One way to determine if a lawnmower blade is properly balanced is to simply slip the blade’s center hole over a nail protruding from a wall. Hold the blade in the horizontal position and let go. If it remains level, then it’s balanced. However, if either end rotates down toward vertical, the blade is out of balance; sharpen the heavier end to remove some metal and then retest it.
While the nail-in-the-wall technique does work, for more precise results, use a lawnmower blade balancer, a multi-tiered, cone-shaped metal fixture.
Place the balancer on a flat surface, then set the blade on top; the pointed, stepped designed accepts blades with various diameter center holes. If the balance is balanced, it will remain level. If not, it’ll list to one side or the other, indicating which end is heavy and needs additional sharpening.
8. Once the blade has been sharpened and balanced, place it back onto the mower in its original position. Use the wrench to snugly tighten up the retaining nut or bolt. Reattach the ignition wire, fill the gas tank and take your newly sharpened mower out for a test run.